Understand flooring pre-installation preparation
It’s clear that flooring pre-installation preparation is the key to a successful, long-lasting floor. Before a single plank is laid, you want to ensure your home is ready for the process. Taking these steps keeps you (and your installers) confident that each board will settle correctly, stay protected from moisture, and deliver the look you have in mind for years to come.
A 2024 consumer report from multiple flooring contractors found that poor flooring pre-installation preparation was one of the top reasons homeowners had to redo or repair new floors sooner than anticipated. Fortunately, by coordinating a few essential steps, you can skip premature wear and jump straight to the enjoyment of your freshly finished surface.
Below, you’ll see how to clear your space, check moisture levels, prepare the subfloor, and acclimate materials. All these details matter, whether you’re installing hardwood, laminate, or another material entirely. With proper flooring pre-installation preparation, you’re setting yourself up for success.
Make no mistake: smart flooring pre-installation preparation saves time, money, and frustration. Let’s walk through everything you should know.
Clear and protect your space
A smooth installation day starts with an open work area. According to Bubblegum Flooring, clearing the room before work begins helps your installer move faster, keeps your belongings safe, and prevents accidental damage. Flooring Pre-Installation Preparation starts with creating space. When you remove any furniture, décor, or delicate items, you give the floor professional a blank slate for measuring, cutting, and laying down boards.
Remove all furniture and electronics
- This includes couches, tables, TVs, lamps, and any breakables. Some contractors request that you take down wall décor as well, especially if it’s close to the floor or vulnerable to vibrations. This is a crucial part of Flooring Pre-Installation Preparation.
- Wrap fragile items in bubble wrap or moving blankets, then place them in another room to avoid dust. This precaution goes hand in hand with smart Flooring Pre-Installation Preparation, especially in homes with antiques or collectibles.
Take steps to protect valuables
- If you can’t move certain items (like a piano or a large bookshelf), talk with your installer about protective coverings or physically partitioning them from the work zone.
- Dust control is another reason Flooring Pre-Installation Preparation matters. Cover doorways with plastic sheeting so dust doesn’t migrate into other parts of your home.
Ensure easy, safe access
- Flooring specialists often move in and out of your home with tools, adhesives, and new materials. Make sure entryways and walkways are clear, well-lit, and free of slip or trip hazards. Clear routes are essential to thorough Flooring Pre-Installation Preparation.
- If you live in a multi-story building or have narrow hallways, discuss the best routes to carry heavy items in. Flooring Pre-Installation Preparation also includes identifying trouble spots ahead of time.
Create a plan for heavy or awkward furniture
- If you have large appliances or built-ins, decide whether they’ll be moved or temporarily lifted. Some people install flooring around fixed kitchen islands, while others prefer a uniform look under everything. These decisions fall under smart Flooring Pre-Installation Preparation.
Clearing your space may sound labor-intensive, but it’s worth every bit of effort. Not only do you protect your belongings, you also set the stage to minimize dust or debris on installation day. Plus, your installer can do their job faster, which may reduce costs. For more detailed home-prep ideas, check out how to prepare your home for flooring installation preparation.
Address moisture issues early
Moisture remains the silent culprit behind warping, buckling, or other forms of damage, especially with hardwood, laminate, and vinyl. Experts at Bubblegum Flooring emphasize testing for moisture as one of the most important steps in flooring pre-installation preparation. Even a slight excess (like a damp subfloor) can compromise adhesives, cause boards to expand, or shorten your flooring’s lifespan.
Test your subfloor humidity
- Check the relative humidity (RH), particularly in basements or other damp-prone areas. You can buy a simple moisture meter from a hardware store to do a quick check. RH checks are a fundamental part of Flooring Pre-Installation Preparation.
- Make sure that any readings fall within acceptable ranges for your chosen flooring. Hardwood usually needs an RH between 30% and 50%. Not staying within this range can render your Flooring Pre-Installation Preparation incomplete.
Consider installing a vapor barrier
- If you’re working with laminate, a vapor barrier can protect it from ground moisture. In high-moisture zones like basements or bathrooms, this can be a game-changer for Flooring Pre-Installation Preparation.
- For some vinyl or engineered flooring, the underlayment may already include a moisture barrier (check manufacturer details). Still, verifying it is part of good Flooring Pre-Installation Preparation.
Address leaks and humidity sources
- Slow leaks from old pipes or poorly sealed windows can raise subfloor moisture. Fixing these issues promptly can help you avoid mold or structural damage. Any ignored moisture threat can undo proper Flooring Pre-Installation Preparation.
- If you live in a high-humidity climate, running a dehumidifier for a few days before installation can significantly lower moisture levels. This is one of the easiest steps in Flooring Pre-Installation Preparation.
Schedule professional testing if needed
- For peace of mind, you might hire a pro to do deeper moisture tests (like measuring Moisture Vapor Emission Rate, or MVER). Mannington Commercial highlights the importance of checking both RH% and MVER to prevent flooring failures down the road. These deeper insights are part of advanced Flooring Pre-Installation Preparation.
- Local flooring companies may offer this service as part of an overall floor evaluation.
Taking these steps guarantees that your subfloor is nice and dry, which dramatically reduces the risk of post-installation issues. After all, once your brand-new floor goes in, the last thing you want is to discover hidden moisture that leads to swelling or adhesive breakdown.
Prepare the subfloor thoroughly
If your subfloor isn’t stable or level, you’ll see and feel the consequences in your finished surface. Whether you plan to install hardwood, laminate, tile, or another material, the subfloor must be free of debris, cracks, and peaks or valleys. A 2022 guideline from Mannington Commercial indicates the subfloor should not vary more than 3/16 inch over 10 feet for most installations. That’s why Flooring Pre-Installation Preparation must start with assessing the base layer. Let’s break down how to achieve a sturdy, even foundation.
Inspect for structural issues
- Look for signs of rot, mildew, or any parts that feel spongy underfoot. According to Wood and Beyond, a structurally sound subfloor is mandatory for stable floors that won’t squeak or warp. This step is fundamental in proper Flooring Pre-Installation Preparation.
- If you detect serious concerns (like warped boards or termite damage), have a builder or contractor fix them before installing new flooring. These fixes are essential for durable results and a complete Flooring Pre-Installation Preparation checklist.
Remove all old adhesive and debris
- Leftover adhesive from earlier flooring can hurt the bonding of your new planks or tiles. Scrape them off thoroughly, and vacuum or sweep up any loose particles. This cleaning is often overlooked, but it’s a non-negotiable part of Flooring Pre-Installation Preparation.
- Stay alert for stray nails or staples. They can create tiny bumps under the new floor. For smooth results, this kind of detail work is part of meticulous Flooring Pre-Installation Preparation.
Level out high and low spots
- High spots are best handled with light sanding, while low spots often need a floor leveller compound. A perfectly flat subfloor ensures the top layer aligns seamlessly. Without proper leveling, your Flooring Pre-Installation Preparation will fall short.
- When working with rigid materials (like hardwood or tile), even slight ridges can lead to lifted corners or cracks. For best results, measure and level carefully—another pillar of expert Flooring Pre-Installation Preparation.
Clean for maximum adhesion
- Dirt, oil, and dust build-up can keep adhesives or underlayment from sticking. Wood and Beyond states thorough cleaning is critical to avoid lumps or weak bonding. This final cleaning phase is an often-skipped part of Flooring Pre-Installation Preparation, but it’s essential.
- Vacuum, then damp-mop if needed. Be sure the floor is completely dry before moving forward.
Ask about underlayment or primer
- Some flooring materials, like laminate, require a separate underlayment. This layer can improve insulation, reduce noise, and add moisture protection in certain environments. Always include these considerations in your Flooring Pre-Installation Preparation.
- Priming the subfloor is sometimes recommended with tile or certain vinyl adhesives. Check the manufacturer’s instructions for exact guidelines.
Properly handle expansion joints (in commercial spaces or large residential areas)
- Expansion joints are deliberate gaps that allow the building to expand or contract. Mannington Commercial notes that ignoring these joints can lead to buckling or stress cracks. Any expert in Flooring Pre-Installation Preparation will insist on planning for these.
- Consult your installer about how best to fill these cuts or transition them for a smooth final result.
When you take time to address every subfloor detail, you ensure that your new flooring will look and feel fantastic. If you’re curious about a deeper dive on this topic, see what is the best way to prepare a subfloor for installation. Once the base is solid, the rest of the installation tends to go much more smoothly.
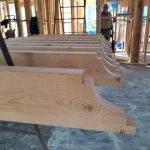
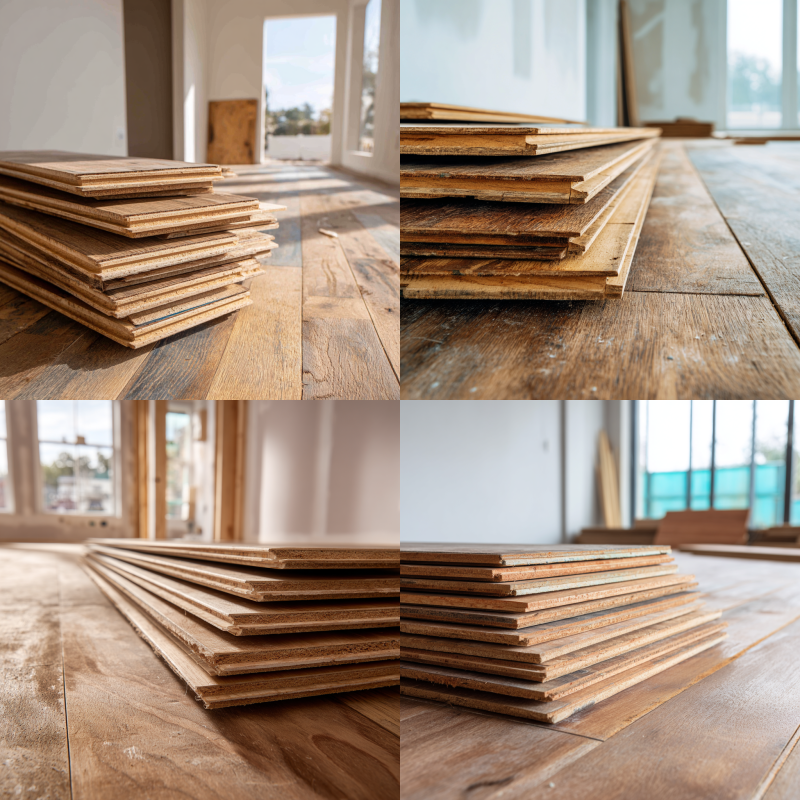
Acclimate and plan for installation
Many flooring materials, especially hardwood, laminate, and engineered wood, need time to adapt to your home’s climate. This process, known as acclimatization, is a key step in Flooring Pre-Installation Preparation. It involves letting the planks rest in the room where they’ll be installed. According to Bubblegum Flooring, you should open the boxes for 48–72 hours so the boards can adjust to the temperature and humidity levels of the space.
Unbox your flooring early
- Open each box and spread out the materials as evenly as possible around the room. If you’re using engineered hardwood, check out what is engineered hardwood flooring for more acclimation tips. Laying the planks flat, rather than leaning them, is smarter Flooring Pre-Installation Preparation.
- Leaning the planks against a wall might keep them too jammed together, so aim for a flat position if possible. Flat placement supports even airflow and proper Flooring Pre-Installation Preparation.
Maintain consistent temperature and humidity
- Keep your HVAC system running to replicate normal living conditions. Large temperature swings can cause boards to contract or expand unevenly. Stable climate control is an essential part of Flooring Pre-Installation Preparation.
- A stable environment now helps avoid gaps and squeaks later. Reliable humidity and temperature are baseline standards for accurate Flooring Pre-Installation Preparation.
Plan your layout
- While your boards acclimate, plan how you want the planks to run. Typically, installing boards parallel to the longest wall can make the space appear larger. Smart layout planning is often overlooked in Flooring Pre-Installation Preparation, but it sets the visual tone.
- If you’re mixing different flooring materials, decide on transition strips or thresholds. You can learn more about different materials at what are the different types of flooring materials.
Prepare for door and trim adjustments
- A new floor can sometimes alter the height of your finished surface, which might affect doors or trim. White Keys Flooring recommends lightly sanding or trimming the bottom of any doors that drag on the new floor. These adjustments are often necessary in comprehensive Flooring Pre-Installation Preparation.
- If you have baseboards in place, decide whether you’ll remove and reattach them over the new flooring or use additional quarter-round molding to cover gaps.
Ensure proper ventilation
- Some adhesives or finishing compounds give off mild odors. Keeping windows open or fans circulating makes the space more comfortable for both you and the installer. Proper ventilation rounds out smart Flooring Pre-Installation Preparation.
- If you live in a cold climate, you can crack windows slightly. The key is steady airflow, not a wide-open draft.
Through acclimation and mindful planning, your flooring will adapt to its new home with minimal stress on the boards themselves. You’ll also reduce the chance of post-installation expansions or contractions that might spoil an otherwise flawless job.
Wrap up your flooring pre-installation preparation
When you put all these steps together, your flooring pre-installation preparation becomes the backbone of a beautiful new surface. You’ve cleared furniture out, sealed away moisture threats, leveled the subfloor, and given your boards time to settle in. It might feel like a lot of effort, but each step pays you back with better performance and a longer lifespan for your floors.
By double-checking moisture levels, ensuring a flat and tidy subfloor, and acclimating the boards or planks, you set an environment where your new floor can truly shine. You also save yourself future headaches, whether that’s warping, creaking, or having to call contractors back for costly fixes. Good news, though, this is easier than it sounds when broken into simple tasks. If you’d like a quick reference, take a look at what should i do before installing new flooring. That brief overview can reinforce all you learned here.
Soon enough, you’ll be walking across a fresh floor with no squeaks or dips in sight. The time you invest now ensures the final result looks exactly as you envisioned it: smooth, sound, and ready to handle daily life. You’ve got this, so keep your momentum going. Once your new floor is in place, remember to consult resources like how to clean floors after installation or how to maintain new hardwood floors after installation for best upkeep practices.
Ready to Upgrade Your Floors? Let’s Make It Happen.
Whether you’re leaning toward the timeless look of engineered hardwood or exploring budget-friendly options like laminate, choosing the right flooring starts with the right guidance. Explore our full flooring installation guide or get expert help tailored to your home’s needs. Don’t wait—start building a space you’ll love to walk on every day.
Frequently Asked Questions
1. How to prepare your home for flooring installation?
Start with Flooring Pre-Installation Preparation by clearing the entire work area—remove all furniture, electronics, and fragile items. Cover nearby doorways with plastic sheeting to control dust. Make sure installers have clear, safe access through hallways and entry points. If certain heavy items can’t be moved, consult your installer about protective options. Maintain a stable indoor temperature and humidity for acclimation, and plan for temporary adjustments to doors or baseboards if floor height changes.
2. What should I do before installing new flooring?
Before installation, follow these Flooring Pre-Installation Preparation steps:
- Acclimate the materials in the installation room for 48–72 hours.
- Test for moisture in the subfloor using a humidity meter.
- Clean the subfloor of dust, old adhesive, and loose debris.
- Fix any structural issues like rot, uneven spots, or squeaky boards.
- Plan the layout of your flooring, especially if you’re mixing materials or working around obstacles.
- Doing this upfront prevents warping, adhesive failure, and misalignment later.
3. What is the best way to prepare a subfloor for installation?
A solid subfloor is the foundation of successful Flooring Pre-Installation Preparation. Here’s how to get it right:
- Inspect for damage like rot, mold, or soft spots—repair them before proceeding.
- Remove any old adhesives, nails, or staples to avoid uneven surfaces.
- Level the floor using sanding or a leveling compound to eliminate high and low spots.
- Clean thoroughly with a vacuum and a damp mop (then dry fully).
- Apply primer or underlayment if recommended by the flooring manufacturer.
Also, don’t forget to check for expansion joints in large areas or commercial spaces.
4. Is a moisture test necessary if I live in a dry climate?
It’s still a good idea to perform at least a basic check, as unseen plumbing or condensation issues can affect your subfloor. Even in arid regions, basements or ground-level rooms can collect moisture. Err on the side of caution to ensure a successful install.
5. Do I really need underlayment for my floor?
If you’re installing laminate, many products require or come pre-attached with a specific underlayment to help with sound control and cushioning. Hardwood or tile may not need it, depending on your subfloor. Confirm whether your chosen material calls for additional layers.
6. How does furniture placement affect newly installed floors?
Most flooring pros suggest waiting at least 48-72 hours before placing heavy furniture on a fresh floor. This waiting period allows adhesives or finishes to dry or cure. When moving furniture back, use pads or coasters to avoid scratches or dents.
7. What happens if I skip flooring pre-installation preparation?
Failing to test moisture or level the subfloor often leads to immediate or early issues such as warping, loosened adhesives, uneven surfaces, or squeaking boards. Over time, you could face costly repairs or need to replace the entire floor sooner than expected.
Quick Flooring Pre-Installation Checklist for SuccessKey takeaways
- Clear the installation space by removing furniture, décor, and electronics to avoid damage.
- Check subfloor moisture with proper testing, and fix leaks or damp spots early.
- Level and clean the subfloor to create a stable base for your new flooring.
- Let boards acclimate to your home to maintain correct shape and fit.
- Adjust doors and trims to accommodate any changes in floor height.